Friday, April 1, 2011

Chicken Stuffs

Hey there foodies

So we missed a recipe last week due to technical difficulties, but don't worry, great things come to those who wait.  If you've been keeping an eye on our Twitter page you may have seen photos of some fat pieces of stuffed chicken.  Well, I think it's about time to reward you with the recipes!

This is yet another dish that you can get creative with.  Follow the directions and try your own combination of seasonings and fillings.  Lots you can do with this so have fun!  I will show you two different versions I have made.

This dish came out particularly amazing.  And the best part is, it's really easy to make.  This is the type of thing you'd find on the menu at some very high end restaurants.  But you can make it at home in the time it would take to drive there!

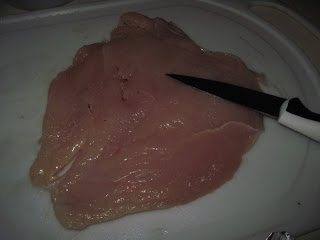
Start with a nice size chicken breast and pound it as flat as possible.  Grab a mix of spices and preheat your oven to 450 degrees.  For the first recipe, I  first used a dry rub of garlic powder, chili powder, red pepper, black pepper, and salt.  Work this into the breast while you are tenderizing it.


Now butterfly cut the breast and rub some more of the seasoning into the inside.  Once saturated, rub in some barbecue sauce.  This will keep the insides tasty and moist!


I wanted to go with a western theme for this piece, so I chose a combination of diced ham, onion, and a spicy cheese blend.  You could add some diced peppers too if you can fit them in!  Use about a handful of each ingredient.  Try to make sure they're all on one side of the cut so you can fold it easily.


Fold the chicken up, making sure everything fits nicely within the pocket.  Now cover the outside with barbecue sauce.  You don't need a lot for this, a few blobs will coat the chicken nicely.

Now for the fun and messy part.  Grab a few strips of your old friend BACON!  Two to three strips should suffice.  Stretch out each strip, making sure it doesn't break.  Now carefully, tightly wrap the bacon around the chicken.  Hold it tightly so nothing falls out.  You may want to start by putting the bacon on the bottom and wrapping it around the top.

You will notice a few grill marks in the photos here.  I originally tried to grill the chicken but noticed it wasn't cooking properly.  The sides don't get cooked, and you can't turn the chicken because the stuffing will fall out.  If you want to cut out a bit of the fat though, put it on a foreman grill for a few minutes after the juices start dripping, but the real cooking will be done in the oven.  Warning, if you use the grill first, the bacon may come out a bit soft in the end...

Wrap the chicken securely in tin foil and place on a cooking tray in the oven.  Cook for 15-20 minutes.  Keep it at 450 degrees, the tin foil locks in the moisture and prevents it from overcooking.


Take the chicken out of the foil and place onto a plate.  Cover with the leftover juices and serve with a nice side dish.


**  BONUS RECIPE  **

Want a quick, easy, and satisfying side?  Take a box of store brand Scalloped Potatoes and make as directed.  Halfway through cooking, add in a can of mixed veggies.  Now you have some healthy vitamins to go with your protein-laden cuisine!

I've done this a few times, so let me share an additional style.  Follow the above directions, but instead use a salt and pepper dry rub.  This time, I used spinach and cream cheese as the filling.  Take a handful of canned or frozen (thawed) spinach and some diced onion.  Take a bar of cream cheese and cut off about half an inch lengthwise.  Add this to the spinach/onion mix and fold over.  Again wrap with bacon.  This time, I breaded each piece with a simple flour coating.  I didn't find this necessary with further recipes, but if you want to get playful and try frying the chicken, this would be a very welcome step.  Wrap in tin foil and cook for 20 minutes at 450 degrees.  This time around, I used the cranberry sauce as seen with the recipes from last season.
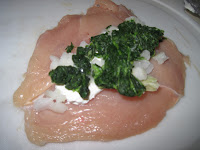


One piece of advice, make sure you dry rub the inside of the butterfly cut.  I tried this a few times, and the ones seasoned inside and out came out much better.

The best thing about this recipe is that it is quick and easy.  Start to finish it shouldn't take more than half an hour.  Plus, you can be very creative with the ingredients.  Other filling ideas I've had include Ham and Pineapple and Spinach and Feta.

So have fun cooking and enjoy!  And please, if you enjoy these recipes, please leave your comments and follow us on our Facebook page.  Followers get sneak peaks and photos of other interesting recipes.

Bon Apetit!

jb


Thursday, March 17, 2011

Shepherd's Pie - Happy St. Patrick's Day!

Hello Foodies and welcome to another holiday edition of Edible Rex.  Hope you're all enjoying this great St. Patrick's Day and are looking forward to an easy-to-make traditional recipe.  This day includes some festive dishes like Corned Beef & Cabbage and Irish Soda Bread, but since I want to get back to my local pub crawl, I'll give you all something quick and easy...  Shepherd's Pie!

You'll need ground beef, onion, beef broth, canned or frozen veggies, mashed potatoes, and shredded cheese.  Since we're all loyal to the bachelor style of cooking, use instant mashed potatoes... it saves a lot of time!  Also have a skillet and brownie pan ready to cook everything, and preheat your oven to 350*!


Start by browning the ground beef in a skillet, and add in a handful of onion (about half a cup).  I also suggest adding a few spices, like basil, black pepper, and a few shakes of cayenne.  When it starts getting brown, add in a can (or frozen bag) of assorted mixed veggies.  Mix everything together and drain the oil. Then place it all in the brownie pan.

Add half a cup of beef broth to the pan.  Don't use more than this or the pie will come out very liquid.  You can use canned broth, or prepare your own from bullion cubes.

Now prepare your mashed potatoes.  If you want to use fresh potatoes, go ahead, but for the time-starved (or just plain starved) mix up a batch of instant potatoes.  A 3.3oz pouch of brand-name dried potatoes will yield enough for the entire meal.  In fact, you can get creative and get some of the flavored varieties to add a special zing to the meal.  Mix up the batch as per the instructions.  Once fluffy, carefully layer them on top of the beef-onion-veggie mix in the pan.

Now for the crust.  Take whatever shredded cheese you have and generously cover the top of the potatoes.  I used a heavy layer of Parmesan cheese first which gives it a nice flaky texture, then topped it with another layer of a Mozzarella and Cheddar mix.

Place in the oven for 20-25 minutes.  Enough time to enjoy a fine Guinness while you wait!

This will yield 3-4 generous portions, or 2 for the famished pub-crawler.

So have a great St. Patty's Day, try not to get too wild, and Bon Apetit!  Or should I say, Erin Go Bragh!


Thursday, March 10, 2011

Season 2, Episode 1 aka The Good Morning Burger

Welcome Back Foodies!  Edible Rex is back with a new season of awesome recipes for all you aspiring chefs... or people just looking for something better than fast food for dinner.  I'm finally going to reveal my famous chili recipe, and stay tuned for more delights like Stuffed Chicken and Pot Roast.  But let's go nuts with our first new recipe...  The Good Morning Burger

Props to you if you get the reference.  Yes, got to admit, this recipe is not my own.  Like anything worth quoting, this one is from The Simpsons:


 "We take eighteen ounces of sizzling ground beef, and soak it in rich, creamery butter, then we top it off with bacon, ham, and a fried egg. We call it the Good Morning Burger..."


I can hear Homer drooling right now...


The burger is as tempting to make as it is difficult to manage.  But this recipe makes it simple for even the least experienced of bachelor chefs.


Start by putting a liberal amount of butter in a frying pan big enough to hold four burger patties and melt it to cover the bottom of the pan.  If you want to fry the bacon, add it now.  It'll add to the heart attack you'll have later.  Personally, I prefer crisping it in the microwave, but to each their own.  Add four burger patties (as close to 18oz as possible) and spread them out equally.  Lastly, top each patty off with a slice of ham.


Ok, since you're an oft-unprepared bachelor chef, you might be missing an ingredient.  So improvise!  I used large-cut pepperoni in place of ham.  Similar meat, more spice!  I also threw in a handful of diced onion... goes great on burgers.


While that's cooking, grab half a loaf of french bread (or a giant roll) and cut it open.  Put aside...  it soon shall meet its toppers!


When the burgers begin bleeding through, flip them.  When the burgers are near your specified 'done-ness', stack them up 2-by-2 and top accordingly.  Leave to cook a few minutes more.


While that is cooking, add an egg to the frying pan.  The recipe calls for a fried egg, but a scrambled egg cooked in the grease of its fallen meat brethren should do the trick.  I'm just not a fan of the standard 'solid-yoke' fried eggs.

When cooked, place it on top of your burgers.  Cheese is optional, but I like to use it not just for the taste and texture, but to keep the burger together.


Place it on top of the bun (and another piece of cheese if you wish) and cover.  Check it out, your giant creation.  Awesome.  But that's not it...


The Good Morning Burger is really messy.  So want to contain it better?  Grill it!  Yes, make the Good Morning Burger panini style.  Break out the ol' Foreman grill, the burger should fit perfectly on the small one.  Lightly push down on the bread... this will squish it down, covering the melange of meaty innards.  And make the bread nice and toasty!


So celebrate Simpsons Mania while making a crazy-awesome meal.  Add a side of fries for ultimate perfection.  And don't forget, have fun, foodies!