Happy New Years everybody! Figure while I'm cooking up some snacks for my party tonight I'd share a quick and easy recipe for Cocktail Weenies.
So quick, that you can cook these up in the few minutes you have running between work and your party!
You will NEED two packs of hot dogs, some brown sugar or maple syrup, and a bottle (~18oz) of a sweet BBQ sauce. In addition, you can try out some other flavored ingredients, such as: hot sauce, chili or red pepper, garlic, beer, ketchup, mustard, vinegar, salt. Hey it's a festive event... be creative!
Get a sharp knife and slice the hot dogs lengthwise into 1/3" pieces. Throw them into a medium sized pot. If adding dry spices or vinegar, put them in now and mix it so the pieces are equally covered. Now pour in the entire bottle of BBQ sauce, stirring as you go. Save the bottle with it's innards dripping in sweet sweet BBQ sauce. You'll want to fill it about 3/4 way with water (also try cola or a stout beer).
Add the brown sugar/maple syrup into this bottle (at least 3-4 tablespoons, add more per taste) and let it melt. Cover and shake vigorously so the sauce, liquid, and sugar all mix together. Pour this into the pot and stir.
Heat to a boil then let sit under medium heat for 10-15 minutes. The sauce will thicken as it cooks. Keep covered on a low heat until ready to serve.
So quick and easy. And cheap too. This appetizer is good for at least 12 people and cost under $4 to make. If you want to go ritzy though, try some smoked sausage or bratwurst instead of hot dogs.
Your cooked party dish will be the highlight of New Years. Well that and the countdown...
Enjoy, and have a decadent 2011!
-Josh
(ps - pix coming soon)
Friday, December 31, 2010
Monday, December 13, 2010
Habanero Fritters
Let me start this one with a shoutout to my friends Merdan and Torre at The Corner Bar on Elliston Place in Nashville. If you pop in at the right time, you might just find me working the grill there! They are the inspiration for this recipe… and the dudes who gave me the Habaneros for this recipe!
And I might as well also give a shoutout to Adam Richman at Man V. Food. I saw this first on his show and decided to come up with my own recipe for these spicy demons. This is the signature appetizer at Salvador Molly’s in Portland, Oregon. But my recipe seems a bit more tame, for anyone who witnessed Adam’s masochistic act on the show!
You will need a box of cornbread mix (and the necessary ingredients. Some require just water, some milk, some egg, etc), butter, sugar, an egg, breadcrumbs, onion, spices, and the great Habanero! You will also need a deep fryer.
Habaneros are the hottest peppers you can commonly find and eat in the US, reaching up to 300,000 Scoville Units (units of spiciness). They are extremely hot, but also very sweet and flavorful. You can sometimes find them in Chili and hot sauces in restaurants and supermarkets.
For this recipe I used six large Habaneros. You can use more or less depending on your heat preference. The ones I made were pretty darn spicy, but not insanely hot. Throw them into a food processor with half a cup of onion and puree finely.
(if you are sensitive to heat, try not to breathe deeply. The aroma can burn your nose!)
Prepare the cornbread in a large bowl as per instructions on the box. Add a quarter cup of butter, a few tablespoons of sugar, the egg, and your habanero/onion mix.
You will need about a cup of breadcrumbs for the recipe. Use whichever type you like, but I prefer the ones I made for the Meatloaf recipe. Take some bran flakes and grind them in the food processor. When pulverized, stir them into the mix.
(I actually used raisin bran. The scattered raisins were a pleasant addition to the fritter!)
Add some spices too. Salt, pepper, and oregano are the basic staples, but you can also add garlic, basil, and anything else you can come up with!
Mix everything together well. You are now ready for cooking.
Using a ladle, I scooped out several balls of the mix and dropped them into the fryer. I didn’t have one, but I’d recommend using an ice cream scoop, as it will release a better sphere.
With a long spoon, rotate the fritters until golden brown on all sides. When ready, lift the basket. If you see batter seeping out through the wires, they’re not done yet, so put it back quickly! When they are finally done, keep in the basket for the oil to drip.
Let cool for a few minutes, and there you go!
Another hint I might suggest would be to put the batter in the freezer for a short while before frying it. Keep an eye on it, you don’t want it to freeze solid, just enough for it to clump together better. Think more ice cream consistency than cornbread batter. I did this quick without this step, and some of the larger ones fell apart upon hitting the oil. You could also toss them in a pan or griddle for a few seconds before throwing them into the fryer – just long enough to solidify the outside. They’ll be more pancake-shaped, but they’ll fry up better if you’re in a rush.
These came out as a spicy, crispy, sweet snack that was perfect for a day of football with the guys. When you bite into them, the heat comes on strong and heavy, but fades rather quickly. This isn’t the type of heat that will ruin your day or make you bowl over your friends for the faucet. But you might want to have a beer or glass of milk ready for the kick you are about to receive!
Enjoy the burn!
Wednesday, December 8, 2010
Bonus: Latkes, The Director's Cut
Ok, remember last week for the first night of Hanukkah I tweeted that I made some Sweet Potato Latkes. Well, they didn't really work out. But figured I'd post the story anyway. I added in some comments and suggestions, so next time they will come out better!


The art of Bachelor Cheffing emphasizes finding new uses for leftovers. So originally I had tried to make Sweet Potato Latkes from my Thanksgiving remainders.
I took a container of mashed and prepared sweet potatoes, and added the same ingredients as the regular latke recipe… onion, egg, and spices. Scooped them into the oil in the same way. Prepared sweet potatoes are mushy and soft, so they clump together nice. I hoped they would fry just as well.


Well, they didn’t L
 |
| Mmm... Burned Sugar |
Holiday sweet potato dishes are already formed into a pasty consistency, and contain a ton of added sugar. The combination of these two factors led to the demise of the dish. The sugar quickly caramelizes and burns. Even turning down the heat, you get a charred patty before the potato ever cooks. Even trying to salvage the burned latkes, I found they fell apart instantly after taking them out of the oil.
The few bits that weren’t burned did taste good, but I basically had to pick the unburned bits off the full latkes. And they were still a bit raw in the middle.
 |
| These few came out ok... |
 |
| Not so much these guys... |
What I would suggest, if you want to try this, is use fresh sweet potatoes. Grate them by hand, and follow the recipe for the original latke. Do this properly and you will have a decadent, crispy pancake!
What can I say, they can’t all be winners. Half the fun is learning from your mistakes. Delicious, delicious mistakes…


 |
| Well, the pics came out good. Too bad they didn't survive outside the pan |
Happy experimenting, and enjoy!
Monday, December 6, 2010
Lotta Latkes!
Happy Hanukkah everybody! Let’s enjoy the holiday with the traditional dish: Potato Latkes!
Hanukkah, the Jewish Festival of Lights, celebrates the miracle that during wartime, the lights at the Great Temple in Jerusalem lasted eight days when there was only enough oil for one day. So for that reason, oily foods are theme of the holiday meals. Jelly Donuts are often seen, but everyone’s favorite dish is the Latke – A pan fried potato pancake.
And for a traditional dish, they’re fairly easy to make. You just need uncooked potatoes, onions, egg, and spices. Luckily, you can more than likely find the potato and onion pre-chopped in your local supermarket freezer section… which is what I used!
Use about a pound of potato and half a pound of onion. If you have fresh potatoes, use a cheese grater and cut them into small flakes. Put them and about half a pound of chopped onion into a large bowl. Make sure the potato is thawed and sticks together… you may need to add a little bit of water. Add your spices; I used a few shakes of salt, pepper, oregano, basil, and a sprinkle of chili powder. Throw in an egg and mix together.

Prepare a frying pan with enough oil to cover the bottom. I probably used a bit too much, but you don’t need a ton to fry these babies up right!
When you hear the oil crackle, spoon out a clump of the mixture and carefully drop it in the pan. Latkes can be any size, but I found that the smaller ones cooked better. Flatten them with your spatula. After 4-5 minutes you will want to flip them… they should come up easy and stay together otherwise let them sit another minute or two.

Ok, you’re not supposed to use metal in a Teflon pan, but I did anyway… just be careful. I don’t trust plastic spatulas in boiling oil, even if they are kitchen-rated.
After another 4-5 minutes, scoop up each patty and let it drip back into the pan to remove the excess oil. Place on a paper towel atop a plate or other surface. I luckily had a pizza box lying around which was perfect!

The excess grease will drain out after a few minutes and you will have a crispy, potatoey Latke ready to be scarfed down at your Hanukkah celebration… or as a quick snack. They’re also good for breakfast in place of your every day hash browns.
Traditionally, Latkes can be served with Sour Cream and Applesauce. But, I didn’t have either of these lying around at the time. But what I did have was leftover cranberry sauce from Thanksgiving. So, like a good bachelor chef, this is what I used, and it worked just as well.

Chag Sameach (Happy Holidays) and Bon Appetit!
Sunday, November 21, 2010
Having a (meat) Ball!
There's nothing like a classic italian-style meatball... Unfortunately many a restaurant just lump some ground beef together. The proper meatball should be a mix of meaty and spiced flavors.
You can make a meatball with pretty much any ground meat you have.. I've seen chicken, turkey, and lamb. But to get the perfect classic taste, I used 2 parts ground beef to 1 part pork sausage. (I used 1lb of ground beef for this recipe) And that's just where the goodness begins!
Meatballs are fairly easy to make. It isn't actually that much different from making a meatloaf.. just in a different shape with a few slightly different ingredients.
On that note, grab a half-cup of bran flakes (or your favorite grainy cereal) and grind them up in a food processor (or with your fists!) until they're nearly powdered. And preheat your oven to 375*
Take your mix of ground beef and sausage and mix thoroughly in a large bowl. Then, knead in an egg. Spread evenly inside the bowl. Cover with a thin coat of tomato sauce and grated Parmesan Cheese, and knead once more.
Then add in the brancrumbs and sprinkle on a layer of each of your favorite spices. I used Oregano, Basil, Chili Powder, and Pepper. The amateur chef may not have Fennel lying around, but if you do, throw some in also! You can also dice in some pepper and onion if you would like. I skipped the onion this time around, but threw in one finely diced Serrano pepper for some heat. Mix together rigorously until everything is evenly distributed.


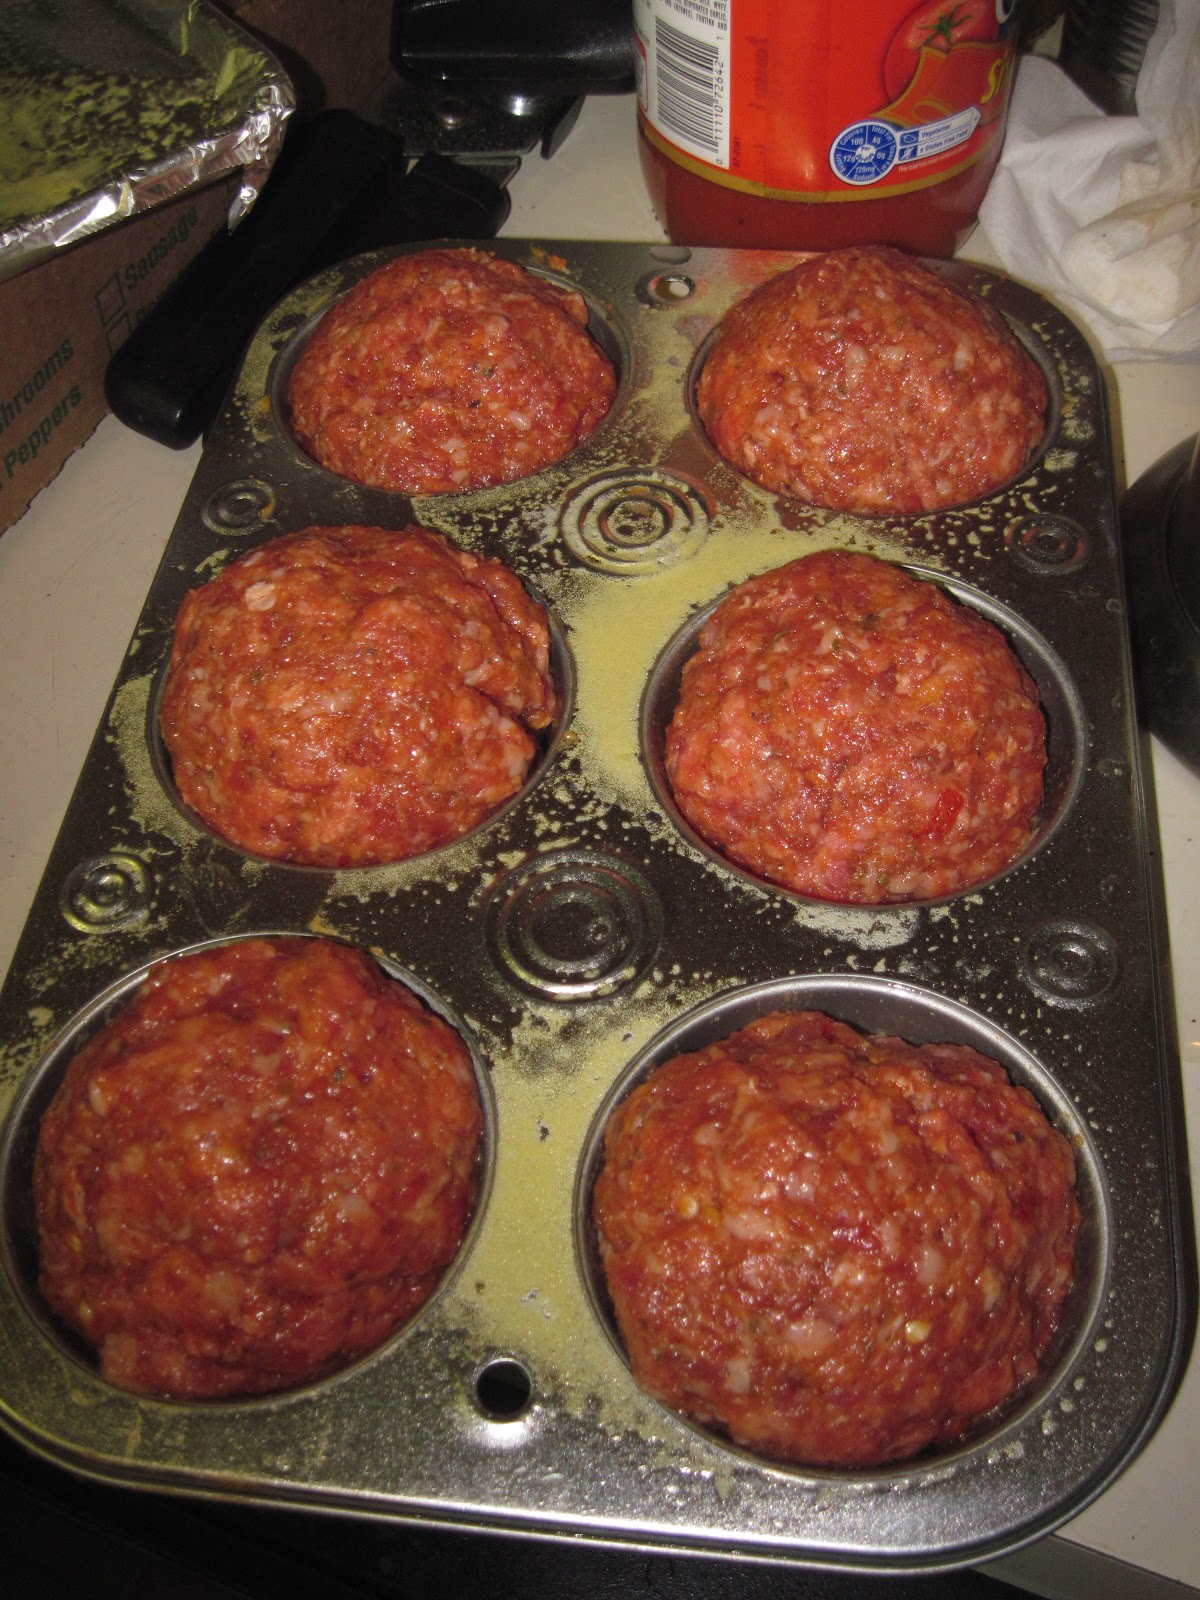
Now for a little Edible Rex secret... how to keep the meatballs in shape. Cooking them in a pan can cause them to fall apart... So I used a...
Muffin Tray!
I actually thought of using the muffin tray as a way to make six even-sized meatballs. But the tray kept the meatballs together and maintained their rotund shape.

So prepare to get messy and ball up a handful of meat. You should get 6 baseball-sized clumps to fill the tray. Pop it into the oven for 20 minutes. Put a larger tray or sheet of tin foil under the tray to catch any oil that may drip

You can use this time to walk the dog, play a round of Wii Golf, or put up some spaghetti... I did the latter.


After 20 minutes, make sure the meatballs are cooked fully through. Take the tray out of the oven and let sit for a minute or two. Scoop them out and place on a paper towel. Wipe the gristle off the sides of the meat and you will see the round goodness.
 Serve classically with pasta and tomato sauce. Or place on a hero roll with sauce and mozzarella cheese for Meatball Parmesan! These look so good, I wanna put one on top of a waffle cone!


Enjoy!
You can make a meatball with pretty much any ground meat you have.. I've seen chicken, turkey, and lamb. But to get the perfect classic taste, I used 2 parts ground beef to 1 part pork sausage. (I used 1lb of ground beef for this recipe) And that's just where the goodness begins!
Meatballs are fairly easy to make. It isn't actually that much different from making a meatloaf.. just in a different shape with a few slightly different ingredients.
On that note, grab a half-cup of bran flakes (or your favorite grainy cereal) and grind them up in a food processor (or with your fists!) until they're nearly powdered. And preheat your oven to 375*
Take your mix of ground beef and sausage and mix thoroughly in a large bowl. Then, knead in an egg. Spread evenly inside the bowl. Cover with a thin coat of tomato sauce and grated Parmesan Cheese, and knead once more.
Then add in the brancrumbs and sprinkle on a layer of each of your favorite spices. I used Oregano, Basil, Chili Powder, and Pepper. The amateur chef may not have Fennel lying around, but if you do, throw some in also! You can also dice in some pepper and onion if you would like. I skipped the onion this time around, but threw in one finely diced Serrano pepper for some heat. Mix together rigorously until everything is evenly distributed.


Now for a little Edible Rex secret... how to keep the meatballs in shape. Cooking them in a pan can cause them to fall apart... So I used a...
Muffin Tray!
I actually thought of using the muffin tray as a way to make six even-sized meatballs. But the tray kept the meatballs together and maintained their rotund shape.

So prepare to get messy and ball up a handful of meat. You should get 6 baseball-sized clumps to fill the tray. Pop it into the oven for 20 minutes. Put a larger tray or sheet of tin foil under the tray to catch any oil that may drip
You can use this time to walk the dog, play a round of Wii Golf, or put up some spaghetti... I did the latter.


After 20 minutes, make sure the meatballs are cooked fully through. Take the tray out of the oven and let sit for a minute or two. Scoop them out and place on a paper towel. Wipe the gristle off the sides of the meat and you will see the round goodness.
 Serve classically with pasta and tomato sauce. Or place on a hero roll with sauce and mozzarella cheese for Meatball Parmesan! These look so good, I wanna put one on top of a waffle cone!

Enjoy!
Saturday, November 13, 2010
Eggs Vindaloo
So as a bachelor chef, I like to find fun and creative uses for leftovers. Why eat the same old thing when you can awesome them up a bit?!?
I was out the other day at Bombay Palace in Nashville, and had some left over Vindaloo and rice. Not enough for a whole meal, but enough to have fun.
The best way I can describe Vindaloo is like a spicy, thick, curried pot roast, but with Lamb or Chicken instead of Beef. With potatoes, and served over rice. It is supposed to be insanely hot, but most restaurants in the US tone it down.
So you know me and my lust for the perfect breakfast... why not give eggs an exotic kick?!?
I started off by scrambling two eggs with peppers, onion, and broccoli. Indian dishes are chock full of veggies, so should be my breakfast.
Then I topped it off with the spicy rice and gravy mixture.

The combination of the Vindaloo kick with the egg was amazing! I typically put hot sauce on my eggs, so this was a nice change-up on the hot flavor. And the rice served as a starchy side in place of my typical hash browns.
In retrospect, I should have scrambled the sauce directly into the egg for a uniform distribution. I had thought the sauce would be too thick, but cooked as a two-egg scramble it would have mixed fine. Also considered doing it omelet style, but figured it would be messy with no cheese holding it together. For next time...

So the lesson of the day is, play with your food! Have fun with leftovers and try to reuse them in unique ways. Don't settle for the 'same old thing' when for minimal effort you can have a different meal every day of the week!
Josh
Tuesday, November 2, 2010
Scramblurger!
Well, maybe I should work on the name a bit, but check out this awesome breakfast:
Here's another Sunday special... It was breakfast time, and honestly, a good cheeseburger goes great in the morning with some coffee... and football! Had a few leftover hamburgers from the night before, so wanted a creative way to use them. So I decided to make a breakfast sandwich that combines the two.
Use your favorite leftover fast-food chain burger for this. I used a double cheeseburger with the fixins. In addition to eggs, I added some spinach and peppers. Gotta get in those vitamins with a man meal like this. Oh, and I also added some BACON!!!
Take the bun off the burger and put it aside. Put the contents in a skillet on medium heat. Chop it up and add in any bonus ingredients... veggies, bacon, etc...


Throw on two eggs and mix together, scrambling the eggs as you go. As it cooks, try to fold it to about the size of the bun.

And speaking of the bun, toss it burger side down, on the skillet for 1-2 minutes. When the egg is fully cooked, scoop everything up and put it back on the bun. And you are good to go!


Awesome breakfast for a football-packed Sunday! Try it with combinations of your favorite fast-food burgers and toppings!

Enjoy!
Thursday, October 28, 2010
Kickin' Alfredo
Hey Kidz! Been busy lately, so here's one that's quick and easy. Chicken Alfredo!
This could be as simple as tossing a chicken breast onto the foreman grill, then onto a bowl of pasta with alfredo sauce. But for the amateur gourmand, you gotta do something extravagant. Still, this is an easy recipe.
Prepare a bowl with around 2 cups flour and spices - for your breading. I added basil, oregano, and pepper. It will be easiest to put this in a tupperware-type container... a lid will help!
Put a pot of water on the stove and leave to boil...
Flatten and dice up a chicken breast (about 1/2 - 1 lb) into 1-inch chunks. I also sprinkled some cayenne powder directly onto the chicken. Now put the chunks into the bowl and shake vigorously. After a minute, open the container and make sure all the chunks are nicely covered in the flour mix.
 |
| Ghost Chicken? |
 |
| A cauldron of awesome... |

While doing this, keep an eye on the pasta. A few minutes after you begin boiling, add some vegetables. I used about a handful each of spinach and broccoli. Gotta get the vitamins in somewhere!
 |
| Mmm... empty vitamins... |

I was in a hurry, so I used a store brand sauce. If you want to make your own, its a mix of milk, flour, butter, and garlic. I'll work on a recipe and let you know!
Mix everything together until all the chicken and pasta is covered in sauce. And voila, you're done! Start to finish this shouldn't even take 20 minutes... The chicken breading and cooking took only a minute or two longer than the pasta to cook.

 |
| Please click on my sponsors so I can get a better camera!!! |
Let me know if you want more quickie recipes, or more extravagant cuisine. I'll continue with a mix of the two in the meantime!

-Josh
Saturday, October 23, 2010
Reuben Omelet
Ok, you talked me in to it! The Reuben Omelet Blog:
Wanted to use up some corned beef that was heading towards the big meat locker in the sky, so I came up with this quickie:
Start out an omelet like normal. Dice up some corned beef and toss it in. Add sauerkraut, swiss, and thousand island dressing to the middle. Fold, serve, eat, enjoy!
Ok, I cheated a bit and used american cheese and italian dressing, but good enough! I also did it more as a scramble since the omelet fell apart on me :S. But this perhaps came out better... the ingredients were more 'cooked' and mixed together... Also, I used corned beef cold cut slices, which rocked, but if you have some pot-roasted corned beef chunks... well lets just say i'm drooling already...

Know how to make a cool, original omelet? Tell us!!! We'll put the best ones in a future post!
-J
Wednesday, October 20, 2010
Awesomeloaf!
Gather ‘round foodies, and bring some friends for this one! How’d you like to hear how to make the world’s greatest Meatloaf?
Usually I don’t make portions this big, but I had a lot of ground beef. And a huge meatloaf is just as easy to make as a small meatloaf. So since this is one you can share, I am going to list the ingredients:
• 2lbs Ground Beef (I used 80/20 chuck this time)
• 1 bag frozen pepper & onion blend (about 12oz)
• 3-4 Strips Bacon
• 2 eggs
• ¼ cup Corn Chips
• ¼ cup Bran flakes
• ¼ cup Cheerios
• Beef broth
• Tomato Sauce
• BBQ Sauce
The best thing about meatloaf is that it is really easy to make. Just make sure the beef is nice and defrosted before you begin.
And make sure you aren’t wearing the nicest of clothes… this one will get messy!!!
First place the beef in a large enough bowl where it will be easy to knead. Add in the bag of diced peppers and onions and make sure they are in small pieces. If not, dice them to about half an inch. My local grocery stores sell these in the freezer aisle… its much easier to keep around than fresh veggies and they keep for much longer. If you can’t find this, just dice one medium onion and a bell pepper.
Before you get your hands all sticky, take the corn chips, bran flakes, and cheerios (or any other oaty cereal) and mash them up. I used a food processor which worked great. You should have about ¼ cup of each after grinding. The pieces should be nicely ground, but not quite to a powder. You’ll see where these come in later…
Pour in enough tomato sauce to cover the beef. Then, knead the mix until the sauce is mixed in well and the peppers & onions are nicely distributed. You basically have a giant meatball here!
Now, add two eggs and knead those in…
So one of the main ingredients in Meatloaf is breadcrumbs... Originally, this dish was invented as a way to stretch out a small ration of ground beef to the entire family. Unfortunately after I started preparing, I realized I didn’t have any breadcrumbs. So I looked around to see what I could add in that place. Knowing that cereals are commonly used as breading, as are breadcrumbs, the idea popped in my head. I wanted to mix the breadiness of cheerios with the stout flavor of bran flakes. Actually, I used Raisin Bran which added a sweet flavor with the added sugar and raisins.
But this wasn’t enough… I wanted something with some salt. There was a bag of tortilla chips right on my shelf. Bingo. Salty. The mix of these three was a perfect combo for my recipe. But play with the ingredients you have on your shelf… plenty of interesting combos to be found!
Add these “breadcrumbs” to the beef and knead until evenly distributed. Now, add enough barbecue sauce to cover the meat. Knead this and repeat. You should end up using at least half a bottle by the end of the recipe. This time around, I actually used a mix of two bbq sauces… one intended for pork and one for beef. See which one works best for you!
Now you are almost ready to cook. Prepare a pan large enough to contain all the beef by putting a thin layer of bbq sauce on the bottom and the sides. I personally use one of those disposeable metal baking pans for easy cleanup. Evenly distribute the meat into the pan. Then cover the surface with bacon.
Mmm bacon. The recipe gets more decadent every step! If you are a real bacon fan (and who isn’t), try covering the sides and bottom with it too!
Take some more bbq sauce and cover the top of the meatloaf with a thick coat. Then take some beef broth (A dissolved bouillon cube works fine) and pour it on top, just enough so the water level reaches the top of the loaf… you really shouldn’t need more than ¼ cup but it depends on the size and shape of the tray. This step will prevent the sides from burning and give you nice juicy end pieces!

Bake in the oven for about 45 minutes. Halfway through, carefully remove it and pour off the excess grease into the sink. Then return it, making sure no oil drips in the oven. When you are done, make sure it is cooked all the way through and brown in the middle. Allow to sit a few minutes and you’re good to go!
I served this with a side of Potatoes and Veggies Au Gratin. Complicated? Not at all! I cooked up a store brand Au Gratin Potato mix, and added in a can of mixed vegetables. Easy enough!
The meatloaf came out tender and decadent. Easily the best meatloaf I’ve ever had. It was a fusion of so many flavors… especially sweet and savory. Words just aren’t enough to describe how amazing it was. But to quote the great Aldo Raine, “this one may very well be my masterpiece”
Now I always like to give my input on what I could do better for next time. As amazing as this was, I think next time I am going to work on a way to make it less greasy. The fact that I was cooking 80/20 beef with bacon provides an oily texture which could be improved on. Next time I’m going for a leaner beef, like 93%. But I think a better suggestion would be to pop a hole or two in the bottom of the tray (why I suggest the disposable metal pan) before putting it into the oven, and placing another pan below it to catch the drippings. This should degrease the meatloaf enough without drying it out and prevent the tedium of having to drain it halfway through.
So give it a try and let me know what you think. I guarantee you’ll love this one!
And if you do, please join us on our Facebook and Twitter pages. The link to “Like” Edible Rex on Facebook is in the right column, and follow us at @EdibleRex on Twitter! Oh, and if you really like us, click on an ad or two… help keep me cooking!!!
Bon Appetit!
Usually I don’t make portions this big, but I had a lot of ground beef. And a huge meatloaf is just as easy to make as a small meatloaf. So since this is one you can share, I am going to list the ingredients:
• 2lbs Ground Beef (I used 80/20 chuck this time)
• 1 bag frozen pepper & onion blend (about 12oz)
• 3-4 Strips Bacon
• 2 eggs
• ¼ cup Corn Chips
• ¼ cup Bran flakes
• ¼ cup Cheerios
• Beef broth
• Tomato Sauce
• BBQ Sauce
The best thing about meatloaf is that it is really easy to make. Just make sure the beef is nice and defrosted before you begin.
And make sure you aren’t wearing the nicest of clothes… this one will get messy!!!
First place the beef in a large enough bowl where it will be easy to knead. Add in the bag of diced peppers and onions and make sure they are in small pieces. If not, dice them to about half an inch. My local grocery stores sell these in the freezer aisle… its much easier to keep around than fresh veggies and they keep for much longer. If you can’t find this, just dice one medium onion and a bell pepper.
Before you get your hands all sticky, take the corn chips, bran flakes, and cheerios (or any other oaty cereal) and mash them up. I used a food processor which worked great. You should have about ¼ cup of each after grinding. The pieces should be nicely ground, but not quite to a powder. You’ll see where these come in later…
Pour in enough tomato sauce to cover the beef. Then, knead the mix until the sauce is mixed in well and the peppers & onions are nicely distributed. You basically have a giant meatball here!
Now, add two eggs and knead those in…
So one of the main ingredients in Meatloaf is breadcrumbs... Originally, this dish was invented as a way to stretch out a small ration of ground beef to the entire family. Unfortunately after I started preparing, I realized I didn’t have any breadcrumbs. So I looked around to see what I could add in that place. Knowing that cereals are commonly used as breading, as are breadcrumbs, the idea popped in my head. I wanted to mix the breadiness of cheerios with the stout flavor of bran flakes. Actually, I used Raisin Bran which added a sweet flavor with the added sugar and raisins.
But this wasn’t enough… I wanted something with some salt. There was a bag of tortilla chips right on my shelf. Bingo. Salty. The mix of these three was a perfect combo for my recipe. But play with the ingredients you have on your shelf… plenty of interesting combos to be found!
Add these “breadcrumbs” to the beef and knead until evenly distributed. Now, add enough barbecue sauce to cover the meat. Knead this and repeat. You should end up using at least half a bottle by the end of the recipe. This time around, I actually used a mix of two bbq sauces… one intended for pork and one for beef. See which one works best for you!
Now you are almost ready to cook. Prepare a pan large enough to contain all the beef by putting a thin layer of bbq sauce on the bottom and the sides. I personally use one of those disposeable metal baking pans for easy cleanup. Evenly distribute the meat into the pan. Then cover the surface with bacon.
Mmm bacon. The recipe gets more decadent every step! If you are a real bacon fan (and who isn’t), try covering the sides and bottom with it too!
Take some more bbq sauce and cover the top of the meatloaf with a thick coat. Then take some beef broth (A dissolved bouillon cube works fine) and pour it on top, just enough so the water level reaches the top of the loaf… you really shouldn’t need more than ¼ cup but it depends on the size and shape of the tray. This step will prevent the sides from burning and give you nice juicy end pieces!

Bake in the oven for about 45 minutes. Halfway through, carefully remove it and pour off the excess grease into the sink. Then return it, making sure no oil drips in the oven. When you are done, make sure it is cooked all the way through and brown in the middle. Allow to sit a few minutes and you’re good to go!
 |
| Excuse me if I drool a little bit... |
 |
| "Plated" aka "Why I need a SLR camera" |
The meatloaf came out tender and decadent. Easily the best meatloaf I’ve ever had. It was a fusion of so many flavors… especially sweet and savory. Words just aren’t enough to describe how amazing it was. But to quote the great Aldo Raine, “this one may very well be my masterpiece”
 |
| I'm in the Meatloaf cooking business, and business is-a boomin! |
Now I always like to give my input on what I could do better for next time. As amazing as this was, I think next time I am going to work on a way to make it less greasy. The fact that I was cooking 80/20 beef with bacon provides an oily texture which could be improved on. Next time I’m going for a leaner beef, like 93%. But I think a better suggestion would be to pop a hole or two in the bottom of the tray (why I suggest the disposable metal pan) before putting it into the oven, and placing another pan below it to catch the drippings. This should degrease the meatloaf enough without drying it out and prevent the tedium of having to drain it halfway through.
So give it a try and let me know what you think. I guarantee you’ll love this one!
And if you do, please join us on our Facebook and Twitter pages. The link to “Like” Edible Rex on Facebook is in the right column, and follow us at @EdibleRex on Twitter! Oh, and if you really like us, click on an ad or two… help keep me cooking!!!
Bon Appetit!
Wednesday, October 13, 2010
Country Fried Awesome!!!
Cube steak was on sale at Harris Teeter this week, so I decided to make a Country Fried Steak for dinner today. Figure I’ve been living in the south for two years so it’s about time. Been practicing my pan frying and breading skills and think I’ve gotten them down well enough. So why not bread and fry a slab of beef. That’s a man meal right there!
First thing you gotta do is pound out the meat. Cube steak has already been tenderized but it’ll firm up in the package. The thinner you can make it, the better. Just try not to make any holes in the meat.
I then coated the meat in a spice blend. I used a mix of salt, pepper, chili powder, and basil - A few shakes on each side. Then comes the breading. I kept it simple, using flour and only flour… not even an egg, as the beef is sticky enough. Hand coat the steak until it’s completely white. Make sure you are thorough… pull the beef as you do it to make sure the cracks in the meat get coated.
Now the fun part. Coat the bottom of a skillet with oil, put the burner up to 6, and get ready to fry when the oil starts bubbling. Leave each piece down on each side until the breading on the top side is completely saturated in the oil… it should cook through the meat. Then carefully flip it over and fry another few minutes.
You may want to consider rebreading the meat a minute or two into flipping… some may have fallen off in the oil or when you flipped it. Breading it a second time will give it a thicker, crispier crust.
Keep an eye on the steak, possibly flipping it once or twice more for a minute each side. Total cooking time should be between 8 and 12 minutes. Make sure the breading is crispy and remove the steak from the pan. You now want to let the grease drip out of the steak. You can use the paper-towel-on-a-plate method, but I prefer letting it drip dry, like if it was in a fryer basket. What I did was put it directly on the oven rack with a pan directly under it to catch the drips. (Disclamer: Clean the rack after so you don’t start a fire!)
Let it dry 2-3 minutes, and you are good to go my friend…

Or are you…
I forgot the gravy! It’s not Country Fried Steak without the special creamy gravy.
Using my keen culinary senses, I deduced what I had in my fridge that could constitute a good CFS gravy. Something creamy, something chunky, something meaty… hmm…
The verdict: I combined some alfredo sauce with breakfast sausage. The sentencing: delicious!
Put one (yes one is more than enough) breakfast sausage (the precooked type you find in the freezer section) in a bowl, cut it in half, and put it in the microwave for a minute and a half. It should be nearly cooked and in a bit of its own grease. Mash up the sausage into little bits… the smaller the better. This should release some of the extra juices. Pour enough of the alfredo sauce in the bowl to cover your steak (I used about half a cup for 2 pieces). Mix together and microwave for another minute to minute 30. Add a dash of pepper, mix again, and it’s ready to top off your fried steaky goodness!

Looking back, the only thing different I would do is make sure the meat was more tender. Seriously, you want it as flat as possible… a good CF Steak can split with your fork. Get a rolling pin if you have to! Otherwise this was nearly perfect, an easy-to-make hearty meal. You’ll be so protein filled that it'll pass through your genes and your kids will grow up to be NFL linemen. Ok, maybe not, but believe me when I say this is Ultimate Man Meal!

Happy Frying!
Monday, October 11, 2010
The Bachelor Salad
Wow, I'm shocked I got this far into the blog without telling you about the most basic of bachelor cuisine you can make: The Bachelor Salad. Believe it or not, I do try to eat healthy, and that includes my veggies with each meal. And the easiest way to get these veggies quickly is in a salad.
I buy lettuce for sandwiches and stuff, but there's no way I can finish a head by myself before it goes bad. So a salad is naturally the best way to use it up.
Problem is, when you live the bachelor life, veggies don't keep very well. Even a minimal purchase will go bad before you have the chance to consume it all: A good tomato won't last for more than a week - less after you cut into it. Cucumbers wither after a few days. And unfortunately you can't freeze most veggies that go into a salad. You basically need to eat everything at once or you'll be wasting food.
So how does one get their daily dose of greens and not worry about things going bad? Improvise! Yes, use what you have around. So I've come up with a simple recipe for things that will ordinarily be in my fridge.
I combine:
A bowlful of lettuce
A handful of pickle chips
A handful of Goldfish crackers (or crumbled tortilla chips)
Grated Parmesan cheese
And my dressing of choice du jour.
Sometimes if I have apples or raisins, i'll throw those in too. Apples actually keep well in the fridge, so stock up!
This recipe is just an idea on how to get in a daily salad if you're not the "run to the market every day" type. It's good because pickles and lettuce have a lot of vitamins, the cheese has protein, and the salad will take up some room that a heavy entree would otherwise consume... gotta watch those calories! Be creative and throw in what you normally have around... thats your bachelor salad!
And guys, consider it manly if you eat it with your meat entree ;)
Wednesday, October 6, 2010
Cornbread Chicken
So a while ago I mentioned on Twitter that I was playing around with ideas for breading. I've been using dry coatings, like flour and breadcrumbs, which work, but don't quite achieve the restaurant quality I've been looking for. So I've been looking at wet batters... and this time I used cornbread!
There were a few ideas for breaded-and-fried chicken that I had... mostly based around a stuffed chicken breast. But this experiment was on the batter... working on a good filling recipe! So I decided to go with chicken fingers with dipping sauce.
Those of you in the mood to have some messy fun will love this one... Have some water nearby, your hands will get sticky and covered...
I cooked up about a pound of chicken, which was the perfect amount for a box of cornbread. In fact, this yielded more than I expected... 2 huge portions or 3 good size portions. Leftovers for me! This is an easy recipe to adjust, just put in less/more flour and cornbread mix.
That's all you really need for this... your cornbread mix will probably require milk and/or an egg so have that on hand...
To begin, you need to flatten the chicken. In retrospect, I didn't pound it enough... the thinner pieces battered and fried much better. If you have thick fillets, butterfly them and keep pounding. When they're nice and flat, cut them into 1-inch wide strips. Or any shape, really. Some of the nugget-size end pieces fried up real good!
Your hands are going to get sticky with flour, so I suggest mixing up the cornbread now. Follow the directions on the box... most mixes require an egg and milk. You'll want to add in about an extra quarter-to-half cup of milk or water to thin the batter... otherwise it gets stiff and unmanageable. Mix in about 2 tbsp of sugar also. Stir 'till mixed and put aside. You'll want to prepare your frying pan too... pour in enough oil to cover the bottom of the pan.
Next, roll the pieces in flour. I suggest inside a bowl or tray. Make sure they're covered thoroughly and put them to the side. When you are done, you're ready for the really messy part. First, turn the heat on under the frying pan about halfway.
Place the floured pieces in the bowl of cornbread mix, a few at a time. Stir them around with a fork... but then use your hands to make sure each piece is saturated in batter. With the fork, scoop out each piece, let it drip over the bowl, then place into the frying pan. Repeat until the pan is full. Now is a good time to wash your hands.
Monitor the heat on the frying pan... I found 6/10 to be about the right heat. Each side takes about 4 minutes. You'll know its time to flip when the edges start looking crispy and brown... similar to the edge of a pancake. The fork should work fine for flipping so long as you don't overfill the pan.
 When you are done frying, fork out each piece and place on a paper towel on a plate. Pour in some more oil between each skillet of chicken.
And there you have it! Serve with your favorite sauce - I suggest something sweet like Honey Mustard or Barbecue or Sweet & Sour. And choose a side dish. You'll need some veggies to ease the guilt of this fried goodness. I made broccoli and cheese. Mmm, I can just taste the heart attack!
Other than using smaller pieces, there isn't much I would do differently for next time. I still want to try a stuffed chicken recipe though... trying to decide between Spinach and Feta, Broccoli and Cheddar, or Cream Cheese and Bacon or Jalapeno. Or any other crazy combination... If you give me a good idea I'll give you a shoutout!
Happy eating!

*note: tried a cold one for breakfast. awesome!
*note2: When cutting the chicken, make sure you trim as much fat possible. Chunks of fat tend to mess with the texture...
There were a few ideas for breaded-and-fried chicken that I had... mostly based around a stuffed chicken breast. But this experiment was on the batter... working on a good filling recipe! So I decided to go with chicken fingers with dipping sauce.
Those of you in the mood to have some messy fun will love this one... Have some water nearby, your hands will get sticky and covered...
I cooked up about a pound of chicken, which was the perfect amount for a box of cornbread. In fact, this yielded more than I expected... 2 huge portions or 3 good size portions. Leftovers for me! This is an easy recipe to adjust, just put in less/more flour and cornbread mix.
That's all you really need for this... your cornbread mix will probably require milk and/or an egg so have that on hand...
To begin, you need to flatten the chicken. In retrospect, I didn't pound it enough... the thinner pieces battered and fried much better. If you have thick fillets, butterfly them and keep pounding. When they're nice and flat, cut them into 1-inch wide strips. Or any shape, really. Some of the nugget-size end pieces fried up real good!
 |
| Now that's a Chicken Nugget! |
Next, roll the pieces in flour. I suggest inside a bowl or tray. Make sure they're covered thoroughly and put them to the side. When you are done, you're ready for the really messy part. First, turn the heat on under the frying pan about halfway.
 |
| It's like they're going swimming... |
 |
| And now they're drowning... Yum!.. |

 |
| Some of the bigger pieces... |
And there you have it! Serve with your favorite sauce - I suggest something sweet like Honey Mustard or Barbecue or Sweet & Sour. And choose a side dish. You'll need some veggies to ease the guilt of this fried goodness. I made broccoli and cheese. Mmm, I can just taste the heart attack!
Other than using smaller pieces, there isn't much I would do differently for next time. I still want to try a stuffed chicken recipe though... trying to decide between Spinach and Feta, Broccoli and Cheddar, or Cream Cheese and Bacon or Jalapeno. Or any other crazy combination... If you give me a good idea I'll give you a shoutout!
Happy eating!

*note: tried a cold one for breakfast. awesome!
*note2: When cutting the chicken, make sure you trim as much fat possible. Chunks of fat tend to mess with the texture...
Subscribe to:
Posts (Atom)